Are you looking to learn the art of integrating RSS to email so that you can send your blogs as your email newsletters?
If so then you are at the right place…
It is a known fact that to maintain engagements and communication with your subscribers, customers, or even leads, you must feed them valuable information and resources.
These resources and information could be anything like discount offers, new product launch, case study, and most importantly blog posts.
But don’t you think that after working so hard to curate product launches and blog posts, you may need a breather?
Well, you deserve it… But it doesn’t mean that you should abandon the idea of firstly including your blog posts in your email templates and then send them to your subscribers.
What you need is an automated process of adding your newly released blog posts in your email newsletters and send them automatically, that too on a regular basis.
That’s where RSS to email newsletter integration comes in…
If we were talking about this a few years ago, I would have said that it will require a lot of coding.
But since we are living in 2024, it is possible to integrate RSS in email with just a push of a button and a simple copy-paste.
Before we go any further, let’s clear out some basics such as –
What Is RSS?
RSS or Really Simple Syndication is a type of web feed that enables users, subscribers, or readers to get instant updates of new online content such as stories and blog posts.
In normal circumstances, RSS is presented in an XML format so as to prevent compatibility issues.
Usually, RSS works well with applications like Feed Readers which allows readers to subscribe to your blog RSS feeds and later access them from a single location.
With that being said, you may be now wondering –
What Is RSS To Email?
Well, the idealogy behind RSS as email is somewhat similar to the conventional RSS.
That is, to feed the latest content like blog posts to your RSS subscribers.
However, the differentiating part here is that in RSS by email, the notification of the release of the latest blog post and that particular blog post (as a summary) is sent via an email newsletter.
The best part about this is that the complete process is fully automatic and requires a one-time setup.
Now, you would be wondering why would you need this feature in the first place.
Well, hold on to your horse as I am about to enlighten you with –
Benefits Of RSS To Email Campaigns
- This is one of the prime ways to stay in touch with your subscribers and grow a relationship with them.
- The feature would ensure that your readers don’t miss out on your latest posts. It is probably the best way to leverage traffic to your new blog.
- RSS by email will allow you to focus only on your blog posts. The email newsletter drafting, scheduling, and sending are automatically taken care of by the email service.
- Since this feature requires professional email service, you will have the flexibility to customize your RSS email templates to match your brand.
- All the RSS to email campaigns that are sent successfully have a detailed reporting section. This will give you an idea about the performance of your email campaigns that can be further optimized.
At this point in the article, I am quite sure that you want to jump straight to integrate RSS in email.
Well, without any further ado, allow me to educate you with Sendinblue RSS to email integration feature.

Why Sendinblue For RSS As Email?
I know that you would be wondering that out of all the email marketing services in the world, why would I pick Sendinblue?
Well, for starters, I personally use Sendinblue to send my RSS to email campaigns.
The integration is just a two-step process and the rest of the setup is an absolute breeze.
In addition to this, here are some more reasons which make Sendinblue a top email service provider for this feature –
- As mentioned earlier, the setup process is extremely easy and very minimal.
- Sendinblue offers a customizable readymade RSS email template so that you don’t have to waste time in creating from scratch.
- The application allows you to select the list of your email subscribers in order to receive RSS emails.
- The contact segmentation feature comes in handy to further refine the list of relevant subscribers.
- You will have the flexibility to schedule your RSS email campaigns on a fixed basis. Or have the ability to send a campaign as soon as you publish a blog post.
- Sendinblue is packed with several RSS tags that have the potential to automatically and dynamically populate your email newsletter with relevant data like title, etc.
- All the RSS to email newsletters sent will have detailed reports to measure performance.
And, last but not least, the pricing of Sendinblue is extremely inexpensive. The pricing starts at $25/month and offers 20,000 emails/month sending limits, along with other features.
If you don’t want to commit to it yet, there’s a forever free plan that allows you to send 300 emails/day.
With that being said, it’s time for us to finally learn how to integrate RSS in email with Sendinblue.
Step By Step Guide To Integrate RSS In Email With Sendinblue
In order to get started with this process, you must have an account with Sendinblue.
If you don’t have it yet, click the button mentioned above to create a free account. You can upgrade later as per your requirements.
After signing up, configuring your account and adding your domain address, you will be ready to commence this process.
1. Integrate With RSS Campaigns
After logging in to your Sendinblue dashboard, you should be able to locate the “+” symbol on the blue menu bar.
Click on it.

You will be then redirected to the “Apps & Integration” page where you must click on the “Integrations” tab.

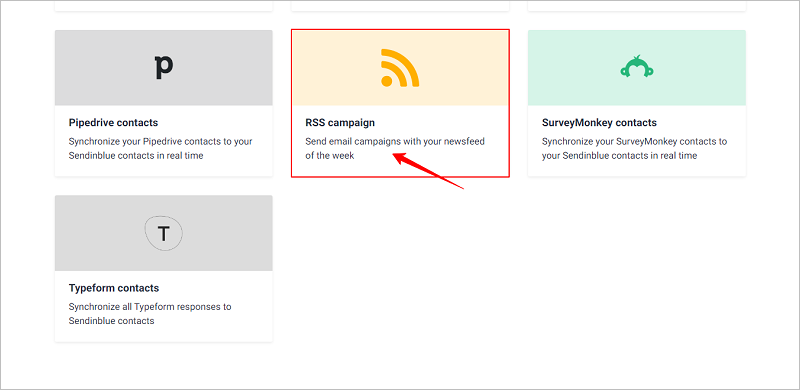
In the “Integrations” page, you will be able to find the section for “RSS Campaigns” at the bottom of your page. Make sure to click it.

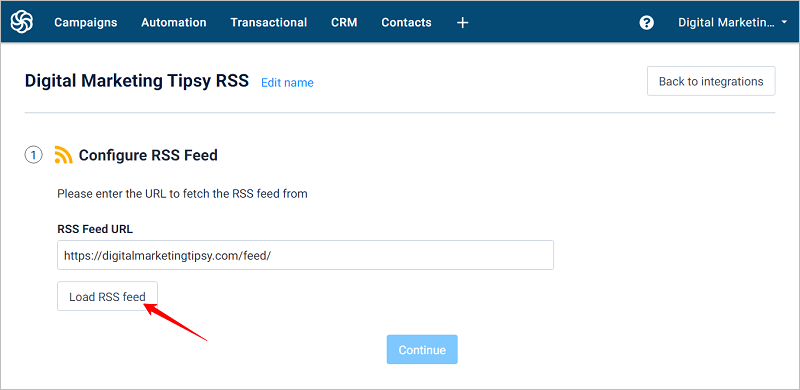
Now, to proceed further, you will have to give this integration a name. For example, I would name it – Digital Marketing Tipsy RSS.

Great..!!
After this step, you would have to enter your RSS feed URL.
If you don’t know what it is your feed URL then simply add “/feed” at the end of your domain. For example – https://digitalmarketingtipsy.com/feed/
Be sure to click on the “Load RSS Feed” button.

Once the RSS feed is successfully loaded, you will be shown a preview of it.
Also, at the end of it, you will be given a set of pre-formatted RSS keys that will be used in customizing your RSS to email newsletter.
Click “Continue”.

At this point in the process, you have successfully completed the integration of RSS campaigns with Sendinblue.
Now comes the fun part that is –
2. Designing Your Email Template
After clicking the “Continue” button in the previous step, you will be then presented with a choice to either use the Sendinblue’s default template or use an email template that you have created earlier.
I would suggest you go with the default template option as it –
- Will save you a lot of time
- Is designed for optimized performance
- Has all the technical aspects
Just select the “RSS default template” option and click the “Confirm email template” button.

Now, you can use the template as it is. But why leave it there?
Click the “Edit email content” button to customize the template to match your brand.

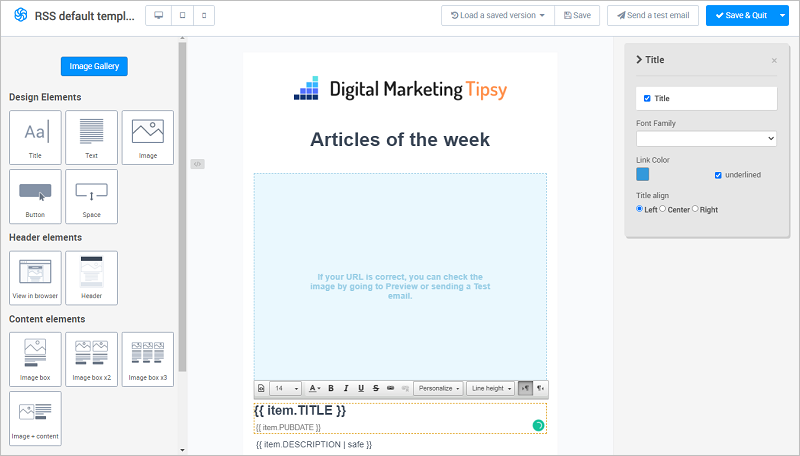
A new window will pop up that will open the Sendinblue’s email template builder.
Here, you will be able to customize the layout, color, logo, add new RSS tags, and much more.
Talking about the RSS tags, you can see that the tags –
- {{ item.TITLE }} is used for automatically adding the title of your recently published blog post.
- {{ item.PUBDATE }} provides the date of post publishing.
And so on…
Once you are satisfied with the layout and appearance of your RSS email template, click the “Save & Quit” button in the email builder.

Back on the set up page, check out the preview of your newly customized template.
If satisfied, feel free to click on the “Continue” button.

You have successfully selected and customized the RSS as email template.
Although, you must know that you can make your RSS email campaigns even smarter and advanced by –
- Inserting loops and dynamic entries.
- Adding pre-defined dynamic parameters with the help of Sendiblue’s new template language.
But as of now, you are good to proceed to the next step…
3. Selecting Your Recipients
Now comes the most important step of all…
You see, you are setting up this RSS campaign for your subscribers. Hence, you should meticulously select your recipients.
On the RSS campaigns set up page, you will be presented with the option to select your recipients from a drop-down list.

Choose the appropriate one and click the “Continue” button.
4. Customize Your RSS Campaign Settings
The next step involves you to configure your campaign settings.
Don’t worry, it isn’t technical or requires and advanced knowledge.
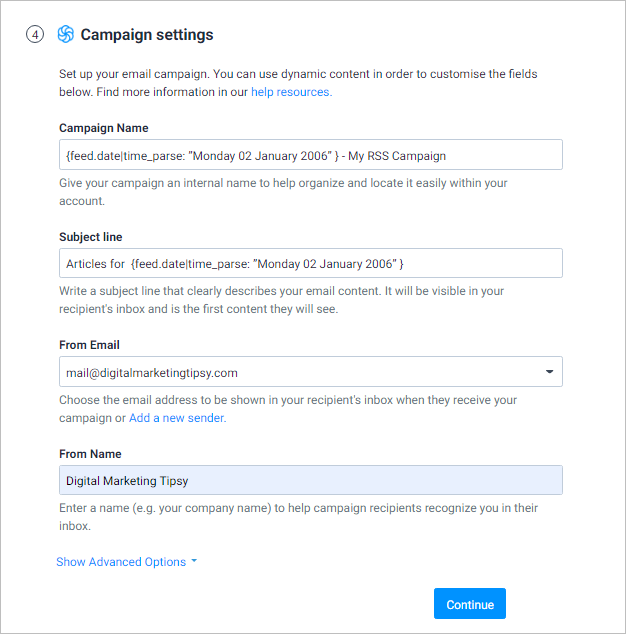
All you have to do is give your campaign a name, enter a subject line, from email, and a from name.
Keep in mind that you can add RSS tags in your campaign name and subject line. This will help you include dynamic content & text.
For example, suppose you have released an article on 19th December 2021 and want to send an email campaign with a dynamic subject as – “Articles for Sunday 19 December 2021”.
In order to do so, your subject should be Articles for {feed.date|time_parse: “Monday 02 January 2006” }

Apart from this, there are several advanced options too.
This includes settings for custom “reply-to” address, custom “to” field, default header & footer, and much more.
Once you have customized all the settings, click the “Continue” button.
5. Campaign Creation & Sending Settings
This setting is divided into two separate sections –
- To automatically create new RSS email campaigns as per your RSS feed
- To manually or automatically send your newly created RSS campaigns.
5.1 RSS Campaign Creation
In this section, you will have to set the frequency of email campaigns created by Sendinblue after checking your RSS feed.
You have the option to select particular days of a week or a specific day of a month.
In simple terms, if you want to send RSS campaigns on a weekly basis, just select a specific day of a week.
Similarly, if you want it to run on a monthly basis, all you have to do is select the day.
You also have the option to create and send RSS to email campaign as soon as you publish a new article. For this, you’d have to select all the days listed in the “Specific days of the week” section.

Lastly, don’t forget to set the time for email creation.
5.2 RSS Campaign Sending
In this section, you will be given a choice between sending your RSS email campaigns automatically or manually.
If you choose the automatic option, the sending will commence as soon as the RSS email newsletter is created.
In the manual setting, Sendinblue will wait for you to send it manually as per your convenience.

Once you have chosen the required option, click the “Continue” button.
6. Activate Your RSS Integration & Campaign Setup
At this point in the setup process, all you are required to do now is “Save” it.
In addition to saving, you will have the option to either activate it or keep it inactive.
If you want this to work as soon as possible, click on the “Save & Activate” button.

That’s it..!!
You have successfully set up a Sendinblue RSS to email newsletter campaign.
Final Thoughts
I hope that you have realized the importance of RSS feeds for your website.
Not only you can keep your subscribers engaged but you can also foster a long-term relationship with them.
Lastly, speaking about the newly created RSS to email campaign, Sendinblue will provide you a detailed campaign analysis of important metrics such as Opens, Clicks, Unsubscribes, etc.
This way, you would know what’s working and what’s not working for your RSS campaigns.
Don’t forget to check out some other important blogs too –

