
Are you still trying to figure out how to start a blog with WordPress?
Don’t worry, you are at the right blog as this article offers you a complete setup guide to start a blog with WordPress.
I know for sure that you’d be terrified when it comes to completing all the “complex” steps and procedures in order to start a blog.
But what if I told you that you have unknowingly completed one-third of that complex procedure?
Do you want to know what? – It’s choosing the right platform for blogging i.e. WordPress.
Now, you are left with just the two-third of “easy stuff” that can be easily done in 30 minutes by following this article.
So, without any further ado, let’s dive in and create a blog with WordPress.
Steps Required To Create A WordPress Blog
Before going further, I am assuming that you have decided and locked-in your blogging niche. If not then you can consider writing about –
- Heath
- Fitness, Yoga or exercises
- Lifestyle
- Travel
- Software reviews
- Marketing (that’s what we do)
- Gadgets
Or something completely different than these.
Now, since you have already completed the first step i.e. choosing the best platform for blogging, you can safely move to the next steps.
Step 1. Choose & register a domain name
Step 2. Get the best WordPress hosting & install WordPress
Step 3. Customize your website with themes & plugins
Step 4. Write your first blog post & publish it
Step 5. Integrate Google Analytics & Google Search Console
That’s it..!!
Are you ready to breakdown each step in detail and get your blog up and running?
Step 1 – Register A Domain Name
The first step in creating a blog with WordPress is choosing a domain name.
If you don’t know it yet, the domain name will be the address of your website. Just like digitalmarketingtipsy.com
Now that you know what is a domain, here’s a checklist that you must use to finalize a perfect domain name –
- Your domain name must be short, simple, and easy to remember. If you could think of a domain name that conveys the essence of your blog then it’s a huge bonus.
- Always go for the .com domain extension. Don’t use the country-specific domain extensions like .us, .in or .uk unless you want to restrict your business to that specific country.
- If you are facing trouble with brainstorming your domain name, you can use tools like NameMesh, LeanDomainSearch, DomainWheel or even Namecheap. You could get tons of domain name ideas with these tools.
- Check if the selected domain name is fresh or an expired one. If it is an expired domain name, check its domain health using MX Toolbox or Uptime.
- Never select a domain name that includes a trademark name, for example – udemy-blogger.com. This could land you in trouble.
And, once your chosen domain name qualifies the above-listed criteria, you are good to register your domain name.
In order to register your domain name, you would have to find a decent domain name registrar.
At the top of my head and also considering their awesome track record, I would suggest you go for either Bluehost, HostGator or GoDaddy.
Registering a domain name would approximately cost you $10-$15/year.
But wait. I’ve got a trick rolled up my sleeve… I am going to hit two targets in one shot for you.
Just skip the domain registration for now and proceed to the next step.
Step 2 – Get The Best WordPress Hosting Plan & Install WordPress
Unlike WordPress.com, you’d need a service to host your website on their servers. And, to do that, you would have to pay $0.80 to $6.90/month.
Now, when you do the maths and take your budget into consideration, you are being asked to invest a considerable sum of money. And, as per me, that’s too much for a beginner.
But hey, don’t worry, I still have that trick with me and trust me, it will help you start a blog using WordPress in a much affordable way.
However, getting a free domain name registration is not the only thing that matters.
Instead, there are quite a few more things that you must consider before finalizing your hosting service provider. For example –
- Uptime and minimum response time
- Bandwidth
- Professional email address
- SSL certificate and security
- Easy cPanel
- 24/7 customer support
Based on these points (and some other too), I have curated a listicle of the best cheap WordPress hosting. Here’s a quick summary of it –
11 Cheap Hosting Services For WordPress
| Hosting Service | Cheapest Plan (per month) | Uptime | Response Time (seconds) |
|---|---|---|---|
| Bluehost | $3.95 | 99.99% | 0.62 |
| HostGator | $2.75 | 99.98% | 0.43 |
| Hostinger | $0.99 | 99.92% | 0.36 |
| SiteGround | $6.99 | 99.99% | 0.69 |
| GoDaddy | $6.99 | 99.97% | 0.63 |
| A2 Hosting | $2.99 | 99.92% | 0.6 |
| DreamHost | $2.59 | 99.96% | 0.71 |
| Namecheap | $1.44 | 99.82% | 0.48 |
| InMotion Hosting | $5.99 | 99.95% | 0.87 |
| iPage | $3.75 | 99.97% | 0.78 |
| GreenGeeks | $2.49 | 99.95% | 0.53 |
You could further analyze each of the hosting services deeply but let me save you the trouble and recommend Bluehost.
Why is Bluehost the most recommended WordPress hosting service?
The answer is simple – it’s the best hosting service with proven track records. The uptime is 99.99% with 0.62 minimum response time.
Now if that’s not enough then you would be very much assured when you’d know that WordPress itself recommends Bluehost.
And, of course, all the other features are simply the cherry on the top.
But that’s not all – After interacting with the Bluehost team, I have managed to negotiate and strike a 60% discount deal for Digital Marketing Tipsy readers.
So when you purchase the plan with the link given below, you’d get up to 60% discount, a free domain name registration, $100 worth of Google Ads & Microsoft Advertising credits and a boost to start a WordPress blog.
Click the link below, open up Bluehost (in a new tab) and follow the next steps…
Get Bluehost WordPress Hosting With 60% Discount
Step 2.1 – Purchase A Bluehost Hosting Plan
Once you open Bluehost in the new tab, you will see a webpage like this –
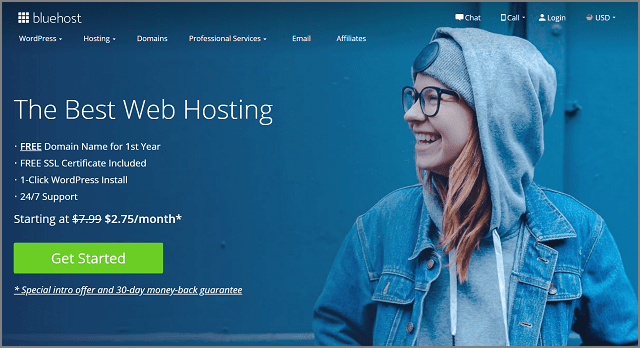
You’d see the discount offer “Starting at $7.99 $2.75/month*”. That’s the Digital Marketing Tipsy’s discount automatically applied for you.
Now, on the top left-hand corner, you’d find the “WordPress” drop-down menu. Simply hover over it and click on “WordPress Hosting”

After clicking, you’d land on the Shared WordPress Hosting page (notice that the discount is still applicable i.e. plans starting at $2.75/month*).
Now you’d have to click on the “Choose Plan” button.

You would be automatically scrolled to the pricing plans section where you’d have to choose an ideal package that would help you to start a blog with WordPress.
In my personal opinion, you should always go with the “Basic Plan”. It is perfect for beginners and is also pocket-friendly.

Once you “Select” the Basic plan, you’d be redirected to the Bluehost Sign Up page where you’d have to enter your domain name.
Remember Step 1? It’s happening now and all you’ve got to do is enter your finalized domain name. And, then click on next.

Please note that you can also skip the domain registration step and enter it later. But I don’t recommend it.
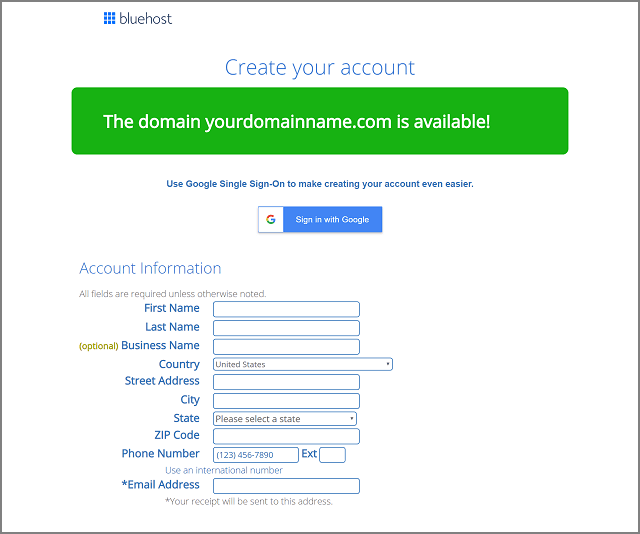
Now moving further, you will be redirected to the Account Creation and Payment page.
The first thing you’d notice here is that if your entered domain name is available or not.
Further, simply enter all the details like name, address, etc. or use Google SSO for quicker account creation.
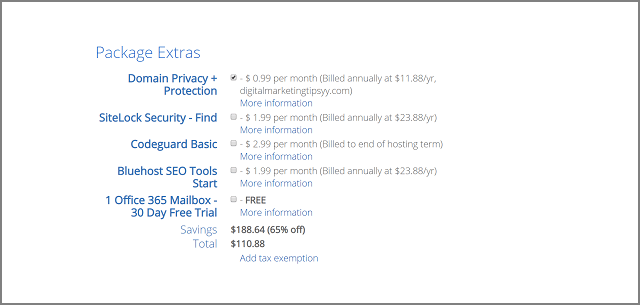
After entering all the account details, you’d be able to review all the package information.
The “Account Plan” row indicates your chosen plan term i.e. 1 year, 2 years or 3 years. If you are looking to extract the best value then I would suggest you go with the 3 years plan term.
Along with this, other information like free domain registration and free SSL certification is also mentioned.

Following this, you also have the freedom to add or remove Package Extras that may contribute to boosting & securing your WordPress blog.
But then again, these come at extra costs. So I would recommend you to deselect each of them except “Domain Privacy and Protection”.
This add-on will definitely help in protecting your domain identity from scammers.
Once you have locked-in your package, you are now set to purchase the plan by entering the payment details.
Bluehost provides secure payment processing with Credit Card or through PayPal.

That’s it..!!
Now you have a domain name registered and it is securely hosted on Bluehost servers.
Step 2.2 – Install WordPress
You’d be extremely delighted to know that you don’t have to perform any tasks to install WordPress.
Bluehost does it for you and that too automatically! And, you only have to set up your login credentials.
It is safe to say now that you have started a WordPress blog.
But hold your horses, we are far from being done here. Now comes the part of customizing your WordPress based website with themes and plugins.
Simply click the “Log in to WordPress” button (available in your Bluehost hosting dashboard) or go to https://yourdomainname.com/wp-admin (replace yourdomainname.com with your own domain).
Step 3 – Customize Your Website With Themes & Plugins
Congratulations on starting a blog with WordPress.
But at the moment, your blog will be having a very minimalistic layout or appearance.
Something like this –

Obviously, you should be changing your current default theme and install some other WordPress theme.
Again, choosing the best WordPress theme for your blog is yet another cumbersome process and somewhat confusing.
Although, WordPress repository houses several free themes but manually trying and testing them out is nearly impossible.
So you’ve got to act smart… How, you ask?
By choosing Astra WordPress theme as your blog’s theme.
Checkout 7 top free and premium WordPress themes that you can use for your new blog.
There are lots of reasons as to why I am recommending you Astra WP theme. Some of them include –
- Over 600,000 people are actively using Astra.
- It claims to be the most lightweight theme and requires less than 50KB of resources.
- Being a lightweight theme, Astra will load in less than 0.5 seconds.
- Offers 50 starter sites or theme templates for free.
- It is compatible with major page builders like Elementor and Beaver Builder.
- Astra is extremely easy to use, even if you do not have any coding knowledge.
And, most importantly, it is tried and tested by me. I am using it for Digital Marketing Tipsy.
Please keep in mind that there are two versions of Astra theme –
- Astra – The free version with limited but sufficient features to start a blog with WordPress.
- Astra Pro – The premium version will unlock all the advanced features.
As of now, the free version i.e. Astra would be an ideal pick. You can of course upgrade to the premium later once your blog starts generating profits.
Moving forward, now that we have finalized the theme for your blog, you can go ahead and install it.
Here’s a step by step guide for the assist –
Step 3.1 – Installing Astra WP Theme For Your Blog
Log in to the WordPress admin panel of your blog. Use the “Log in to WordPress” button available on the hosting service dashboard. Or simply go to – https://yourdomainname.com/wp-admin (remember to replace yourdomainname.com with your domain).
Your dashboard will look something like this –

Now, locate the “Appearance” tab on the left sidebar, hover over it and click on “Themes”.
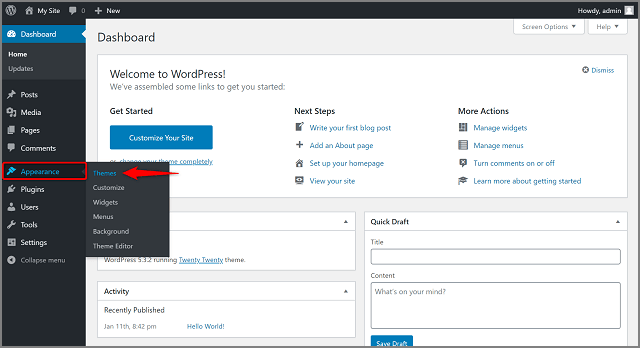
After clicking, you will be redirected to the themes page where you will be shown the current activated theme.
Just click on the “Add New” button and you will be presented with tons of free WordPress themes.

On the right-hand corner, you will have a search box – enter Astra. In just a matter of seconds, WordPress will show the Astra theme.
Now, hover over it and Install & Activate it.

Awesome..!! Now, you’ve got to pick a suitable site template for your blog.
To do that, simply go to Appearance → Astra Options.
Here, you will find all the important shortcuts to customize your theme. But for now, simply focus on the “Import Starter Site” block on the right-hand side.
On that block, you will find a link to “Install Importer Plugin”. Click on it.
Once the plugin is activated, you will be redirected to the Astra Starter Sites template page.

And, in the end, once you have found your site template, simply click on it. Post that, Astra will prompt you to Import Site.

In just a matter of a few minutes, the site template will be fully imported and your blog will have a new look.
Of course, there are a lot of things that need to be customized and the most significant among them would be –
- Your Site Identity – Logo, site title and tagline.
- Color schemes and background
- Site layout and typography
Also, after the template importing process, you should head over to Dashboard → Settings → Reading and select your Homepage and Posts page.

In an ideal scenario, your template would automatically select the pages for you. But sometimes, that’s not the case and you’d have to manually do it by first creating a Blog/Posts page and then assigning it.
Now, moving forward to enhance the performance, security, and usability of your new WordPress blog.
Step 3.2 – Installing Required Plugins For Your Blog
In order to positively start a blog with WordPress, you should be actively maintaining & monitoring its performance, security and growth.
Unfortunately, it is easier said than done.
But thanks to WordPress plugins… They are here to provide you the most advanced features in the most simple way.
In order to install and activate a new plugin, you’d have to follow – Dashboard → Plugins → Add New.

Again, here at the right-hand corner, you can find the required plugins and then install and activate them.
But since you have just created your WordPress blog, you should not be installing any irrelevant plugins.
Hence, I would be recommending the plugins that your new blog needs –
- Page Builders & Editors – Elementor would be the best choice for customizing the front-end appearance of your website. The plugin offers a fluidic drag & drop interface which is an added bonus if you have no coding knowledge.
- Website Backup – UpdraftPlus is the go-to plugin in order to create a backup of your website. The plugin also offers you to store the backup files either on Dropbox or Google Drive.
- Security – In order to save your blog from malware attacks, hackers and other vulnerabilities, you should install Sucuri Security.
- SEO – Although there are some options in this category but sticking with Yoast SEO will be supremely beneficial for your blog. The plugin has to offer everything a new blog needs in terms of SEO.
- Contact Form – In order to hear thoughts and feedback from your blog readers, you must install a contact form plugin. Again, there are tons of options available but I would suggest you go with WPForms plugin.
- Insert Code Snippets – These types of plugins are used to insert a snippet of code into your website (especially headers and footers). They come very handy while integrating Google Analytics with your blog. Most recommended plugins would be Insert Headers and Footers or Woody ad snippets.
Simply follow the procedure to add a plugin mentioned above and you will have all these plugins installed in no time.
And, if you want to check all the plugins (installed, active or deleted) you can go to Dashboard → Plugins.
Step 4 – Write & Publish Your First Blog Post
Posts are the most important components of your WordPress blog.
It can contain promotional articles, listicles, reviews, documentation or something else.
But in order to create a WordPress blog post, you should first consider penning it down remotely on Google Docs or MS Word.
And, from there, you could copy-paste it in your post.
To add or create a new post, you’d have to go Dashboard → Posts → Add New.
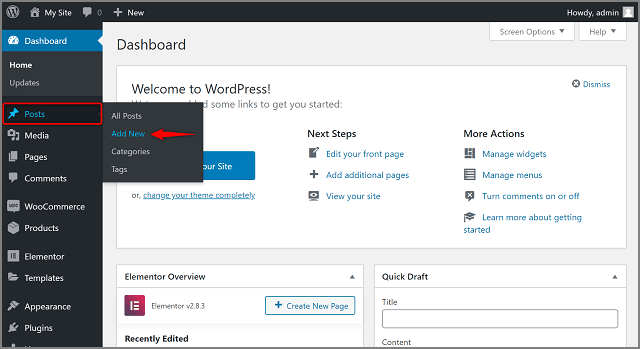
Now, you should be able to see the blank post page. This is your cue to paint the canvas with the color of your words.
Lastly, once you have completed drafting your post, you could either save it for further publishing using the “Save Draft” option or instantly “Publish” it.
Also, keep in mind to assign a relevant category to your post.

After publishing your posts, you can again edit or view the list of posts through Dashboard → Posts → All Posts.
That’s it..!!
You have officially started a blog on WordPress.
All you have to do is regularly write up some articles/posts and start attracting site visitors.
Note – Make sure to properly research for keywords & topics with a free SEO tool like Ubersuggest or any of its alternatives.
Step 5 – Integrate Google Analytics & Google Search Console
To further improve your blog’s reach and also track your visitors, you will be needing some help.
And this help will be provided by Google Analytics and Google Search Console.
Google Analytics is prominent in providing insights on the traffic and visitor behavior on your blog. Meanwhile, Google Search Console will help you understand how Google is indexing your blog and its performance in terms of Google search.
Now that you have understood the need of this step, let’s get started with the integration process –
Step 5.1 – Integrating Google Analytics
The reason behind connecting Google Analytics first is that it streamlines the Google Seach Console integrations.
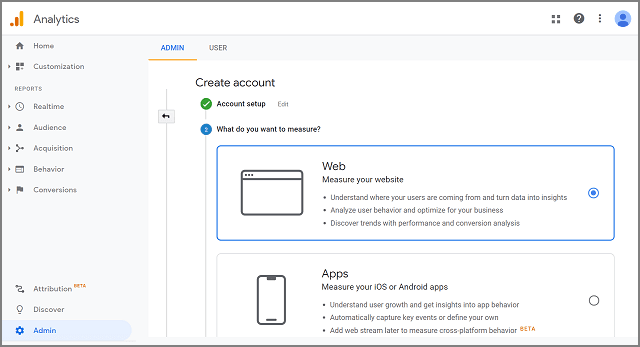
To get started, you should first open Google Analytics in the new tab.
Now, locate the “Admin” tab in the bottom left-hand corner and click on it. Create a new account by adding a suitable account name and then click on next.

Moving further, you would be given a choice about – What do you want to measure? Simply select “Web”.
This would be sufficient for you to track user behaviors and other important site metrics.
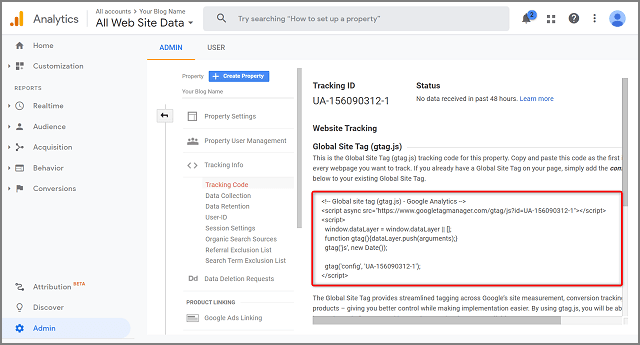
The third step in the account creation will require you to set up your property. Just enter the name of your blog/website, its URL and other basic detail. After that, click on the “Create” button.

So, just after the Google Analytics account creation and property setup, you are now required to copy the website tracking code i.e. Google Site Tag and add it under the <head> tag of your blog and its pages, posts, etc.
It may sound complicated but trust me, it is very easy.
Remember the plugins I have recommended to insert code snippets? Yes, we are going to use it now.
Open up your blog’s WordPress dashboard and go to Dashboard → Settings → Insert Headers and Footers.
Now, copy the Google Site Tag provided by Google Analytics and paste it in the section for “Scripts in Header”.
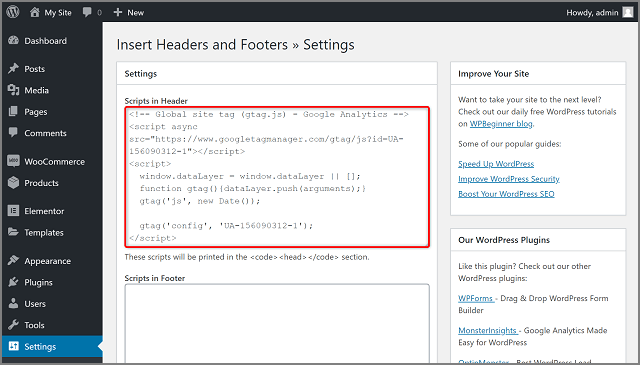
Lastly, click on “Save”.
Great..!! That’s all you need to do in order to integrate Google Analytics with your blog.
Now comes the final step to complete setting up a blog on WordPress i.e. connecting Google Search Console.
Step 5.2 – Integrating Google Search Console
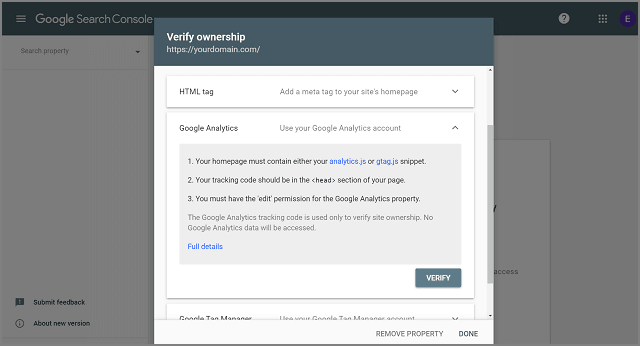
Open up Google Search Console in the new tab and click on “Add Property”.
Here, you will be asked to enter your domain i.e. yourdomainname.com.
But please note that this requires verification through DNS (website hosting services).
Instead of this, enter your domain URL as https://yourdomainnamename.com in the “URL Prefix” section and then click “Continue”.

You will be offered 5 different methods to verify the ownership of your domain. Out of those 5 methods, the most simple one is through Google Analytics.

So after clicking the “Google Analytics” section, an internal section will appear which notifies you that in order to use this verification method, you must have added the Google Analytics tracking code on your blog/website.
But since we have already added the code snippet using the “Insert Headers and Footers” plugin, it’s safe for you to click the “Verify” button.
Congratulations once again! Not only have you integrated Google Analytics and Google Search Console, but you have also successfully started a full-fledged WordPress blog.
What’s Next?
I hope that after reading this setup guide, you now know how to start a blog with WordPress.
Moreover, I strongly believe that you must have simultaneously created your WordPress blog as well.
If not then what are you waiting for? You are literally 5 easy steps away from starting your own blog.
And, once you do start your blog, keep on adding new valuable content on it.
Obviously, that’s not all… You should also learn more about different types of digital marketing strategies that include SEO, creating backlinks for your blog, marketing, generating leads, and also, updating your published content.
Also, check out the articles on the best blogging tools. This is going to give your blog’s reach a massive boost and an exponential growth.
Lastly, don’t hesitate in seeking our help if you need personal assistance with setting up your WordPress blog. Simply get in touch with us and leave the rest on us.
Also, if you have some more questions, feel free to refer to experts’ tips for starting a blog for your business.
More blogs to check out –
I’m still learning from you, as I’m making my way to the top as well. I certainly enjoy reading all that is written on your website.Keep the stories coming. I enjoyed it!
Awesome Elaina, keep grinding!